
AWS KUBERNETES TUTORIAL
Getting Started with Amazon EKS Auto Mode on AWS
A comprehensive step-by-step guide to mastering Amazon EKS Auto Mode for simplified Kubernetes cluster management and workload deployment.
Amazon EKS Auto Mode represents a significant advancement in Kubernetes cluster management, offering automated infrastructure provisioning and simplified operations. This guide will walk you through every aspect of deploying and managing workloads using this powerful feature.

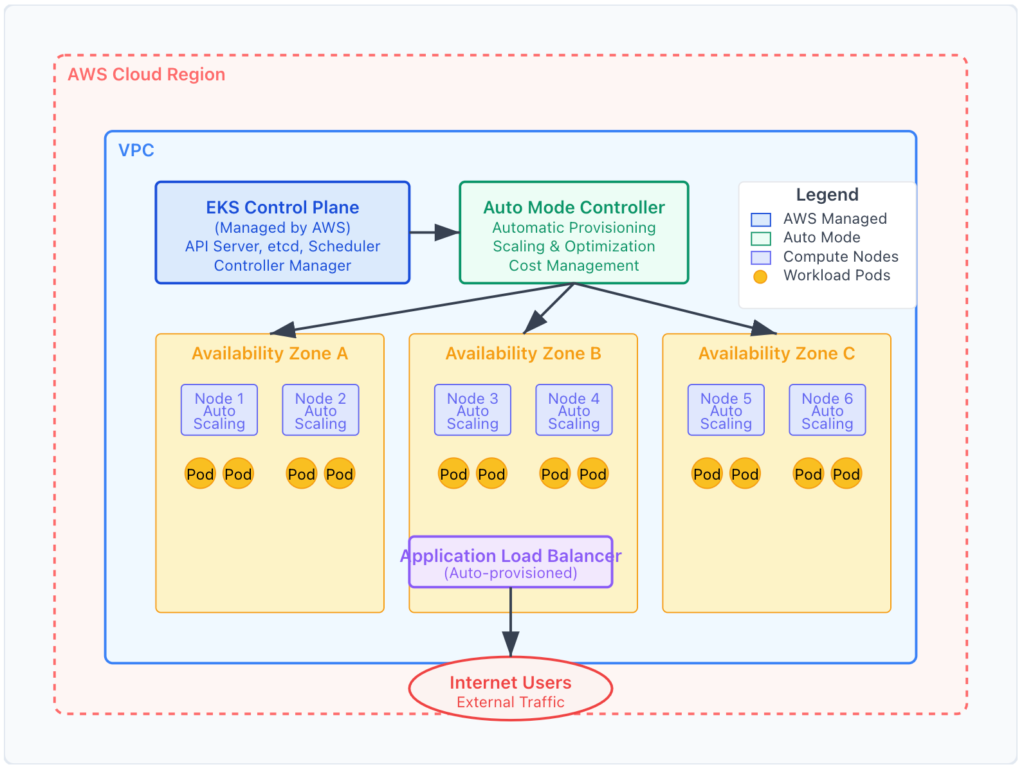
EKS Auto Mode Architecture
What is Amazon EKS Auto Mode?
Amazon EKS Auto Mode is a fully managed Kubernetes experience that automatically provisions, scales, and optimizes your cluster infrastructure. It eliminates the complexity of manual node group management while providing intelligent resource allocation based on your workload requirements. According to the official AWS documentation, EKS Auto Mode ensures optimal performance with minimal administrative overhead.
Key Benefits
- Automatic infrastructure provisioning and scaling
- Reduced operational overhead and management complexity
- Cost optimization through intelligent resource allocation
- Enhanced security with managed updates and patches
Traditional EKS vs EKS Auto Mode

Auto Mode Workflow Process

Prerequisites
Before diving into EKS Auto Mode, ensure you have the following prerequisites in place:
Required Tools and Access
- AWS CLI version 2.0 or later installed and configured
- kubectl command-line tool (version 1.24 or later)
- eksctl utility for EKS cluster management
- AWS IAM permissions for EKS cluster creation and management
Verify Your Setup
Run these commands to verify your environment is ready:
Step-by-Step Deployment Guide
EKS Auto Mode Deployment Flow

Create EKS Auto Mode Cluster
Start by creating your EKS cluster with Auto Mode enabled. This will set up the foundation for automated infrastructure management.
# Create EKS cluster with Auto Mode
eksctl create cluster \
--name my-auto-mode-cluster \
--region us-west-2 \
--version 1.28 \
--enable-auto-mode \
--zones us-west-2a,us-west-2b,us-west-2c
Configure kubectl Context
Update your kubectl configuration to connect to the newly created cluster:
# Update kubeconfig
aws eks update-kubeconfig \
–region us-west-2 \
–name my-auto-mode-cluster
# Verify connection
kubectl get nodes
kubectl get pods –all-namespaces
Deploy Sample Application
Deploy a sample application to test the Auto Mode functionality:
# sample-app.yaml
apiVersion: apps/v1
kind: Deployment
metadata:
  name: nginx-deployment
  labels:
    app: nginx
spec:
  replicas: 3
  selector:
    matchLabels:
      app: nginx
  template:
    metadata:
      labels:
        app: nginx
    spec:
      containers:
      - name: nginx
        image: nginx:1.21
        ports:
        - containerPort: 80
        resources:
          requests:
            memory: "64Mi"
            cpu: "250m"
          limits:
            memory: "128Mi"
            cpu: "500m"

---

apiVersion: v1
kind: Service
metadata:
  name: nginx-service
spec:
  selector:
    app: nginx
  ports:
  - protocol: TCP
    port: 80
    targetPort: 80
  type: LoadBalancer
Apply the configuration:
# Deploy the application
kubectl apply -f sample-app.yaml
# Monitor deployment
kubectl get deployments
kubectl get services
kubectl get pods
Monitor Auto Scaling
Observe how EKS Auto Mode automatically provisions nodes based on your workload requirements::
kubectl get nodes -o wide
# View auto-scaling events
kubectl describe nodes
# Monitor resource utilization
kubectl top nodes
kubectl top pods

Best Practices for EKS Auto Mode
Resource Management
- Always define resource requests and limits
- Use horizontal pod autoscaling (HPA)
- Implement pod disruption budgets
- Monitor resource utilization patterns
Security Considerations
- Enable pod security standards
- Use IAM roles for service accounts
- Implement network policies
- Regular security updates and scanning
Configuration Example: HPA Setup
# hpa.yaml
apiVersion: autoscaling/v2
kind: HorizontalPodAutoscaler
metadata:
name: nginx-hpa
spec:
scaleTargetRef:
apiVersion: apps/v1
kind: Deployment
name: nginx-deployment
minReplicas: 3
maxReplicas: 10
metrics:
– type: Resource
resource:
name: cpu
target:
type: Utilization
averageUtilization: 70
– type: Resource
resource:
name: memory
target:
type: Utilization
averageUtilization: 80
Troubleshooting Common Issues
Pods Stuck in Pending State
When pods remain in pending state, it usually indicates resource constraints or scheduling issues.
# Diagnose pending pods
kubectl describe pod <pod-name>
kubectl get events –sort-by=.metadata.creationTimestamp
# Check node capacity
kubectl describe nodes
Slow Auto Scaling Response
Auto Mode may take time to provision new nodes. Check scaling policies and cluster configuration.
Cost Optimization Strategies
EKS Auto Mode provides several mechanisms to optimize costs while maintaining performance:
Automatic Cost Optimization Features
Intelligent Instance Selection
Auto Mode automatically selects the most cost-effective instance types based on workload requirements.
Spot Instance Integration
Seamless integration with spot instances for significant cost savings on fault-tolerant workloads.
Dynamic Scaling
Resources scale down automatically during low-demand periods to minimize costs.
Resource Right-sizing
Continuous monitoring and adjustment of resource allocation based on actual usage patterns.
Monitoring Costs
# Use AWS Cost Explorer API to track EKS costs
aws ce get-cost-and-usage \
–time-period Start=2024-01-01,End=2024-01-31 \
–granularity MONTHLY \
–metrics BlendedCost \
–group-by Type=DIMENSION,Key=SERVICE
kubectl top nodes
kubectl top pods –all-namespaces
Conclusion
Amazon EKS Auto Mode significantly simplifies Kubernetes cluster management by automating infrastructure provisioning, scaling, and optimization. By following this guide, you’ve learned how to deploy workloads effectively while leveraging the platform’s intelligent automation capabilities.
Key Takeaways
- EKS Auto Mode reduces operational complexity while maintaining full Kubernetes functionality
- Proper resource specification is crucial for optimal auto-scaling performance
- Monitoring and observability remain essential for production workloads
- Cost optimization is built-in but requires understanding of usage patterns


